Stand Alone GUI
The Python
There is quite a few changes needed so start a new file and save it as gui3.py with the following code.
#!/usr/bin/env python

import gtk
import gobject
import gladevcp.makepins
from gladevcp.gladebuilder import GladeBuilder
import hal
import sys,os

# set up paths to files
BASE = os.path.abspath(os.path.join(os.path.dirname(sys.argv[0]), ".."))
libdir = os.path.join(BASE, "lib", "python")
sys.path.insert(0, libdir)
datadir = os.path.join(BASE, "share", "linuxcnc")
xmlname = os.path.join(datadir,"gui3.glade")

import linuxcnc

class gui3(object):

  def __init__(self):
    self.emc = linuxcnc
    self.status = self.emc.stat()
    self.builder = gtk.Builder()
    self.builder.add_from_file(xmlname)
    self.halcomp = hal.component("gui3")
    self.builder.connect_signals(self)
    self.window = self.builder.get_object("window1")
    self.window.show()
    self.panel = gladevcp.makepins.GladePanel(self.halcomp, xmlname, self.builder, None)
    self.halcomp.ready()
    # The gobject.timeout_add() function sets a function to be called at regular intervals
    gobject.timeout_add(100, self.periodic) # time between calls to the function, in milliseconds
    self.machine_status = 0

  def periodic(self): # fetch status items and update screen
    self.status.poll()

    data = self.status.actual_position[0]
    text = "% 9.4f"% (data)
    self.builder.get_object("dro_x").set_text(text)

    data = self.status.actual_position[1]
    text = "% 9.4f"% (data)
    self.builder.get_object("dro_y").set_text(text)

    data = self.status.actual_position[2]
    text = "% 9.4f"% (data)
    self.builder.get_object("dro_z").set_text(text)

    return True # must return True to keep running

  def on_hal_stat1_mode_mdi(self, widget, data=None):
    self.mode_mdi = 1

  def on_test_button_clicked(self, widget, data=None):
    self.status.poll()
    print self.machine_status

  def on_window1_destroy(self, widget, data=None):
    print "quit with cancel"
    gtk.main_quit()

  def on_gtk_quit_activate(self, menuitem, data=None):
    print "quit from menu"
    gtk.main_quit()

if __name__ == "__main__":
  app = gui3()
  gtk.main()
Run the GUI
There are at least two ways to run your GUI, installing it or running from a RIP (Run In Place) git checkout.
Install your GUI
-
To install your GUI rename gui3.py to gui3 with no extension. Open a terminal and change to your directory that contains the gui3 and gui3.glade files. Type in ls and make sure the gui3 file is green, if not change the permissions to execute with chmod +x gui3. Now to copy these files to the installed locations for LinuxCNC use these commands in a terminal.
sudo cp gui3 /usr/bin sudo cp gui3.glade /usr/share/linuxcnc -
From the Applications > CNC menu run LinuxCNC Stepconf Wizard and create a new config and name it gui3. When you get to the Parallel Port Setup page select Unused for the following pins.
-
ESTOP Out
-
A Step
-
A Direction
-
Spindle CW
-
Spindle PWM
-
Amplifier Enable
-
-
Accept the placeholder values for the rest of the pages and click apply. Open up the gui3.ini file with your editor and change the DISPLAY entry from axis to gui3. In the [TRAJ] section add NO_FORCE_HOMING = 1.
-
By using the Stepconf Wizard to create our configuration it has created a desktop icon called launch gui3 so now we can run our gui using the launcher.
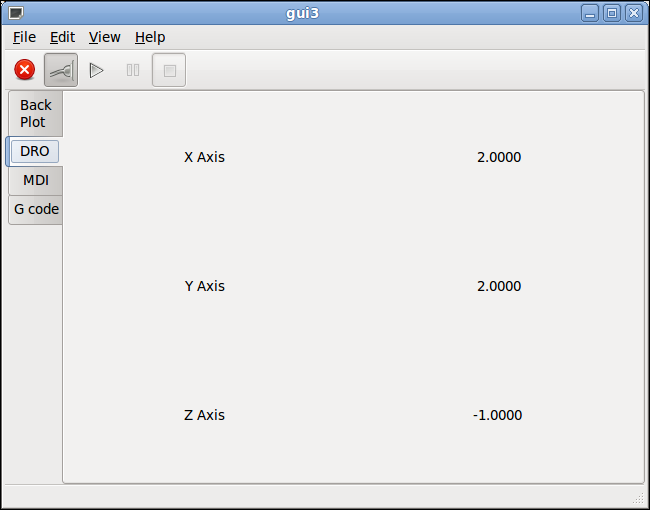
Your GUI should look like this now.

|
Note
|
If your GUI won’t run, right click on the launch gui3 icon and select properties. Copy the Command: line and right click on the desktop and select Create Launcher…. Change Type: to Application in Terminal and paste the copied command to Command:. Give it a Name: and click on OK. This will run in a terminal so you can see any errors. |
Run from a RIP
Now we will make the changes needed to run this from an ini. First we need to clone a copy of LinuxCNC as this needs to be run from a RIP (Run In Place). Open a terminal up and do the following
-
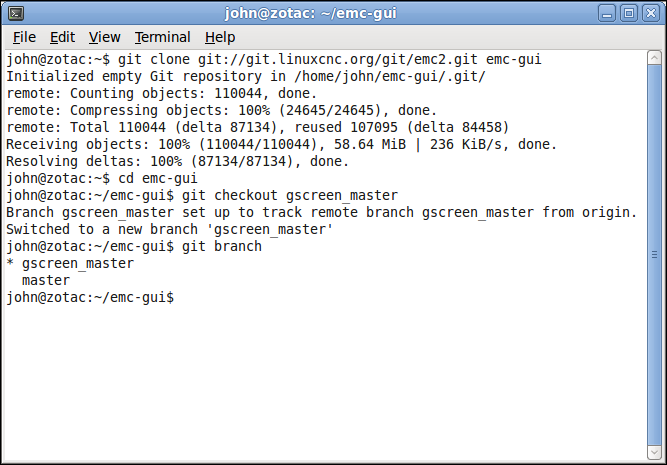
Install Git and clone LinuxCNC and checkout a branch.
sudo apt-get install git-core gitk git-gui
git clone git://git.linuxcnc.org/git/emc2.git emc-gui
cd emc-gui
git checkout gscreen_master
git branch
Your terminal should look like this now.
-
Build LinuxCNC
cd src ./autogen.sh ./configure make sudo make setuid cd .. . ./scripts/rip-environment -
Create a sample configuration by running the config picker and picking the Sim > Axis > Axis config and save it.
./linuxcnc -
Using the file manager navigate to linuxcnc/configs/sim/axis and make a copy the following files.
-
axis.ini
-
axis_manualtoolchange.hal
-
core_sim.hal
-
sim.tbl
-
sim.var
-
simulated_home.hal
-
simulated_limits.hal
-
-
Create a new directory in the configs directory called gui3.
-
Test our copied gui to make sure it works in the same terminal as before. first find the log in name for your computer with pwd in my case it is john.
linuxcnc /home/john/linuxcnc/configs/gui3/axis.ini -
Open the axis.ini file in our gui3 directory and change in the [DISPLAY] section DISPLAY = gui3 and save the file.
-
In the [TRAJ] add NO_FORCE_HOMING = 1 so we don’t have to home to run code.
-
Change the permissions for gui3.py to execute and copy to the emc-gui/bin directory and remove the dot py from the file name.
-
Copy the gui3.glade file to the emc-gui/share/linuxcnc directory.
-
Run the config again to see our custom screen now instead of Axis.
linuxcnc /home/john/linuxcnc/configs/gui3/axis.ini
Run a Test
-
Create a test file in your editor and save it to linuxcnc/nc_files
;GUI 3 test file
F25
G1 Z-0.1
G0 Z-1
X1
Y1
G1 X2
Y2
M2-
Open up gui3.ngc and click on the E Stop and Power button. Now you can run the test file.
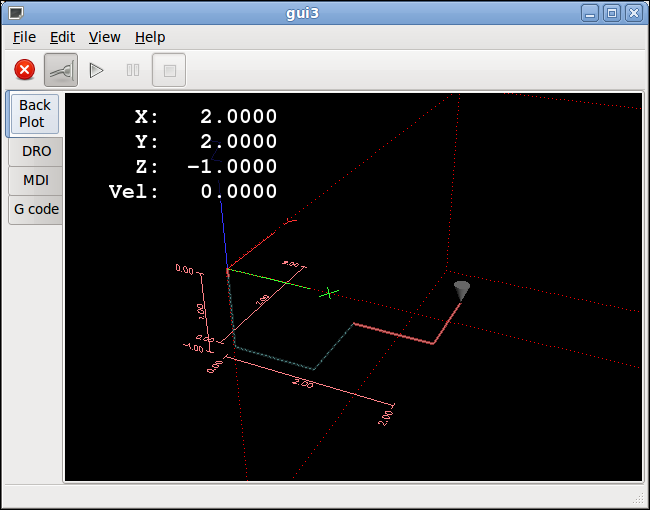
Your GUI should look like this now. It is bare bones but you can open a file and run it and see on the back plot the path.
You can see the DRO change numbers as you run your file as well.