Preparing to Issue a Command
Setup
-
Open up gui4.py and save as gui5.py.
-
Find the on_test_error_clicked function and delete it as it is no longer needed since we removed the button from the GUI.
-
To shorten up our code we will change self.status to self.s and self.command to self.c every where in our code.
-
Next we will add a function to check the homed status of the axis and if the E Stop is off and the Power is on and return True if ready to be homed and False if the axis number passed is all ready homed or the E Stop is on or the Power is off. Looking in the LinuxCNC Integrators Manual Python Interface chapter, The axis dictionary section we can see how to access the status for an axis item. The first parameter is the axis number, the second is the item you want. In our case we will pass the axis number to our function so when we call the function with self.homing_ok(0) the zero is the axis number.
homing_okdef homing_ok(self, axis): self.s.poll() if self.s.axis[axis]['homed'] == 0 and not self.s.estop and self.s.enabled: return True else: return False -
Next we need to create a function for each signal handler we added to the GUI. The on_home_x_clicked function contains a couple of debugging print statements and an if statement to check the status of axis 0 homed and print to the terminal the status. If homing_ok(0) returns True the if self.homing_ok(0): evaluates to True so the statement following that is executed. If it evaluates to False then the else: statement is executed.
def on_home_x_clicked(self, widget, data=None): print 'home x button clicked' print 'homing ok status for x =', self.homing_ok(0) if self.homing_ok(0): print 'ok to home axis 0' else: print 'can not home axis 0' def on_home_y_clicked(self, widget, data=None): print 'home y' def on_home_z_clicked(self, widget, data=None): print 'home z' -
Create a new directory linuxcnc/configs/gui5 and copy the following zipped file to that directory then unzip the configuration files.
-
Open a terminal and change to the directory where your python and glade files are. Type in ls and make sure gui5.py is green which means it is an executable file. Now do the following commands which will copy the two files to the proper directory so they will be available to the installed version of LinuxCNC.
sudo cp gui5.glade /usr/share/linuxcnc sudo cp gui5.py /usr/bin -
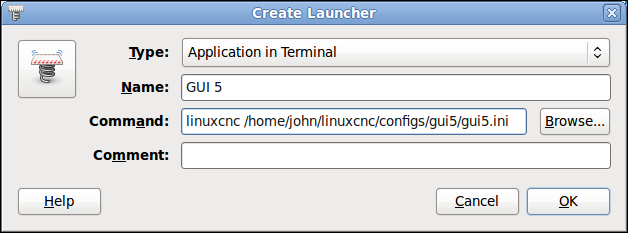
Right click on the desktop and add a launcher. Select Type: Application in Terminal. Type in a Name: like GUI 5. Now Browse to the linuxcnc/ configs/gui5 config and pick the gui5.ini file. now add linuxcnc and a space in front of the path to the ini file.
Your Create Launcher should look like this now.
-
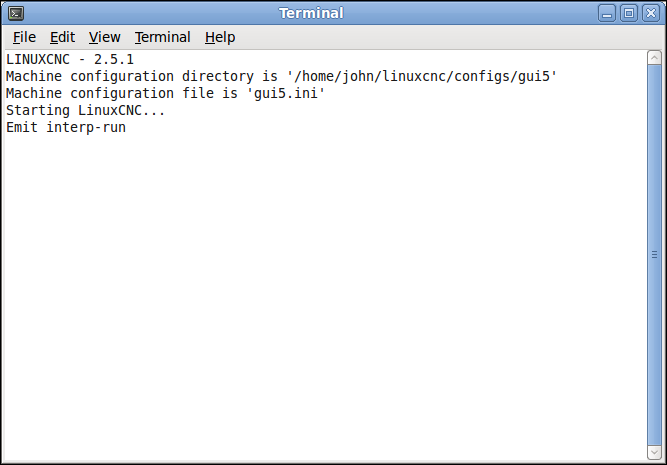
Click OK to save your Desktop Launcher. Run your application from the Desktop launcher and your GUI and a terminal window should pop up.
Your Terminal should look like this now.
-
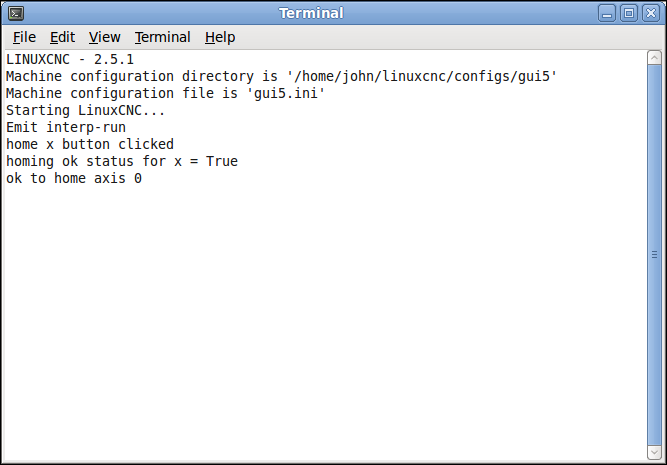
Click on the DRO tab and click on the Home X button. In your terminal you should see the debugging messages.
Your Terminal should look like this now.