Part 6f Creating Jog Buttons
Glade Changes
-
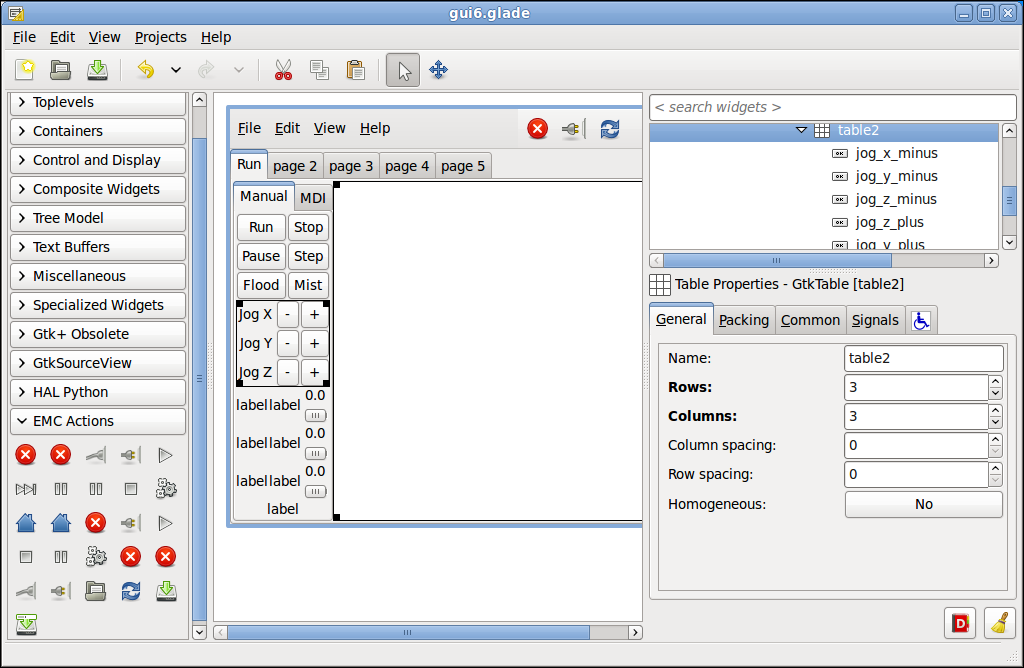
Open up gui6.glade first we will make some changes to the middle table buttons and labels. Change the Label: of each one to:
-
Jog X, -, +
-
Jog Y, -, +
-
Jog Z, -, +
-
-
Change the Name: of each button and add the GtkButton pressed and released signal handlers as follows:
-
Jog X minus button
-
Name: jog_x_minus
-
pressed on_jog_x_minus_pressed
-
released on_jog_x_minus_released
-
-
Jog X plus button
-
Name: jog_x_plus
-
pressed on_jog_x_plus_pressed
-
released on_jog_x_plus_released
-
-
Jog Y minus button
-
Name: jog_ y_minus
-
pressed on_jog_y_minus_pressed
-
released on_jog_y_minus_released
-
-
Jog Y plus button
-
Name: jog_y_plus
-
pressed on_jog_y_plus_pressed
-
released on_jog_y_plus_released
-
-
Jog Z minus button
-
Name: jog_z_minus
-
pressed on_jog_z_minus_pressed
-
released on_jog_z_minus_released
-
-
Jog Z plus button
-
Name: jog_z_plus
-
pressed on_jog_z_plus_pressed
-
released on_jog_z_plus_released
-
-
-
Save gui6.glade and copy it to the installed location.
sudo cp gui6.glade /usr/share/linuxcnc
Your Project should look like this now.
Add Stepgen to the HAL File
-
Open up gui6.hal and add the following lines which will load three stepgens and add their functions to threads. Put this after the addf motion… line.
# stepgen
loadrt stepgen step_type=0,0,0

addf stepgen.make-pulses base-thread
addf stepgen.capture-position servo-thread
addf stepgen.update-freq servo-thread
-
After the above code we will set the parameters of the stepgens. The parameter values will be read from the ini file when the config is loaded by LinuxCNC.
# set stepgen parameters
# Axis 0
setp stepgen.0.position-scale 4000
setp stepgen.0.steplen 1
setp stepgen.0.stepspace 0
setp stepgen.0.dirhold 35000
setp stepgen.0.dirsetup 35000
setp stepgen.0.maxaccel 25

# Axis 1
setp stepgen.1.position-scale 4000
setp stepgen.1.steplen 1
setp stepgen.1.stepspace 0
setp stepgen.1.dirhold 35000
setp stepgen.1.dirsetup 35000
setp stepgen.1.maxaccel 25

# Axis 2
setp stepgen.2.position-scale 4000
setp stepgen.2.steplen 1
setp stepgen.2.stepspace 0
setp stepgen.2.dirhold 35000
setp stepgen.2.dirsetup 35000
setp stepgen.2.maxaccel 25
-
After the above code we will make the enable connections to the stepgens.
# stepgen enable
net xenable axis.0.amp-enable-out => stepgen.0.enable
net yenable axis.1.amp-enable-out => stepgen.1.enable
net zenable axis.2.amp-enable-out => stepgen.2.enable
-
After the above code we will make the command and feedback connections between LinuxCNC and the stepgens. The motor position command is connected to the stepgen position command and the stepgen position feedback is connected to the motor position feedback. Without this you will get a following error if you tried to jog an axis before this step.
# stepgen command and feedback connections
net xpos-cmd stepgen.0.position-cmd <= axis.0.motor-pos-cmd
net xpos-fb stepgen.0.position-fb => axis.0.motor-pos-fb

net ypos-cmd stepgen.1.position-cmd <= axis.1.motor-pos-cmd
net ypos-fb stepgen.1.position-fb => axis.1.motor-pos-fb

net zpos-cmd stepgen.2.position-cmd <= axis.2.motor-pos-cmd
net zpos-fb stepgen.2.position-fb => axis.2.motor-pos-fb
|
Note
|
At this point no connections are made to the parallel port so our GUI won’t really move anything… that will come later. |
Add Stepgen Parameters to the INI File
-
Open up gui6.ini and add the following sections.
# X axis
[AXIS_0]
TYPE = LINEAR
MAX_VELOCITY = 4
MAX_ACCELERATION = 10
BACKLASH = 0.000
MIN_LIMIT = -40.0
MAX_LIMIT = 40.0
FERROR = 0.050
MIN_FERROR = 0.010
HOME = 0.000

# Y axis
[AXIS_1]
TYPE = LINEAR
MAX_VELOCITY = 4
MAX_ACCELERATION = 10
BACKLASH = 0.000
MIN_LIMIT = -40.0
MAX_LIMIT = 40.0
FERROR = 0.050
MIN_FERROR = 0.010
HOME = 0.000

# Z axis
[AXIS_2]
TYPE = LINEAR
MAX_VELOCITY = 4
MAX_ACCELERATION = 10
BACKLASH = 0.000
MIN_LIMIT = -10.0
MAX_LIMIT = 0.01
FERROR = 0.050
MIN_FERROR = 0.010
HOME = 0.000
Python Additions
-
Open up gui6 python file and add a method for each signal handler we added to the Gui.
# jogging def on_jog_x_plus_pressed(self, widget, data=None): print 'jog x plus pressed' def on_jog_x_plus_released(self, widget, data=None): print 'jog x plus released' def on_jog_x_minus_pressed(self, widget, data=None): print 'jog x minus pressed' def on_jog_x_minus_released(self, widget, data=None): print 'jog x minus released' def on_jog_y_plus_pressed(self, widget, data=None): print 'jog y plus pressed' def on_jog_y_plus_released(self, widget, data=None): print 'jog y plus released' def on_jog_y_minus_pressed(self, widget, data=None): print 'jog y minus pressed' def on_jog_y_minus_released(self, widget, data=None): print 'jog y minus released' def on_jog_z_plus_pressed(self, widget, data=None): print 'jog z plus pressed' def on_jog_z_plus_released(self, widget, data=None): print 'jog z plus released' def on_jog_z_minus_pressed(self, widget, data=None): print 'jog z minus pressed' def on_jog_z_minus_released(self, widget, data=None): print 'jog z minus released' -
Save the file and copy to the installed directory.
sudo cp gui6 /usr/bin
Test the GUI
At this point you should be able to run the GUI, release the E-Stop and turn on the Power and when you press on the plus and minus keys see the print message for each method in the terminal.